
Print a Test Page: If you’re looking for a way to test your printer, there are many services that can provide you with a printer test page for free. These services allow you to print out a PDF or Word document of your choice and use it as an example when printing out other pages in the future. This article will walk through how to take advantage of these services and what information they contain so that you can choose which one is best for your needs!
Who should choose Print a test page services?
If you are the owner of a printer, or if you work with printers and want to make sure your hardware is working properly, this service is perfect for you. This can be used by anyone who wants to check the status of their printer, computer, or even both!
If you’re a business owner who relies on your computer and printer, this service is perfect for you. You can use it to check the status of your hardware and make sure everything is in good working order before sending out important documents or printing anything important.
How to take a Printer Test Page?
- Open the printer and make sure that it is turned on.
- Click on the printer icon in the system tray of your computer to open up a window called ‘Printers’ which will show all printers connected with your system.
- Now click on any of them to see what options are available for that particular device, such as driver installation or sharing settings, etc…
- Go back to this step again and look at how many pages you can print per minute (ppm). If there are less than 100 PPMs then chances are that this particular model cannot handle high volumes of printing tasks at once so it might not be worth investing money into buying one if all you want is something simple like typing text into Word documents all day long instead!
Printing A Windows Test Page Using Windows 10
To print a test page using Windows 10, follow these steps:
- Click the Start button.
- In the search box, type print.
- Select File Explorer from the results (if you don’t see it, scroll down).
When File Explorer appears, click the View tab in the ribbon. In the ribbon, click Options. Click Advanced Settings.
In the advanced settings window, click on the View tab. Under Hidden Items, check Show hidden files, folders and drives. Click Apply then OK to save your changes.
If you’re using Windows 10, follow these steps: Click the Start button. In the search box, type the control panel. Select Control Panel from the results (if you don’t see it, scroll down). When Control Panel appears, click Appearance and Personalization.
Printing A Windows Test Page Using Windows 8(8.1)
To print a test page, you must first open the printer and faxes section in Control Panel. Next, right-click on your desired printer and click Print Test Page.
In the File Explorer window, click on This PC. Locate the folder that contains your printer driver. Right-click the file and choose “Open with” or “Choose another app” (depending on which version of Windows 10 you are using)If you are using a wireless printer, you may need to connect it directly to your computer with a USB cable before printing the test page..
Printing A Windows Test Page Using Windows 7
To print a test page, follow these steps:
- Open the Printer Properties window by clicking Start and typing “printer” in the Start Search box. Alternatively, you can press the Windows key + P to launch the Print Screen menu where you can select Print from there.
- Click on More Settings and then select Advanced Settings from within this window.
- In order to print a test page using Windows 7 OS, you will have to go through some additional steps as mentioned below:
- Open Control Panel > Devices & Printers > Add A Printer under the Computer Name tab which appears when you click Add A Printer link located at the top right hand side of the Device Manager window; then follow the instructions given below after selecting the Network option from the drop-down list box provided beneath “Have Disk Space For” section:
Printing A Windows Test Page Using Windows Vista
To print a test page, you will need to open the Start menu and click on Control Panel. Click on Hardware and Sound in Control Panel, then select Printers and Faxes from the list of options.
Next, select your printer from this list (if necessary) by clicking its name in blue at top of the screen. The printer should appear with three tabs: Properties; Paper/Output Options; and Maintenance. Click on Properties for this particular printer if it isn’t already highlighted for you by default; otherwise, click on the Other Settings button if available instead (it may be hidden below the Device Manager section).
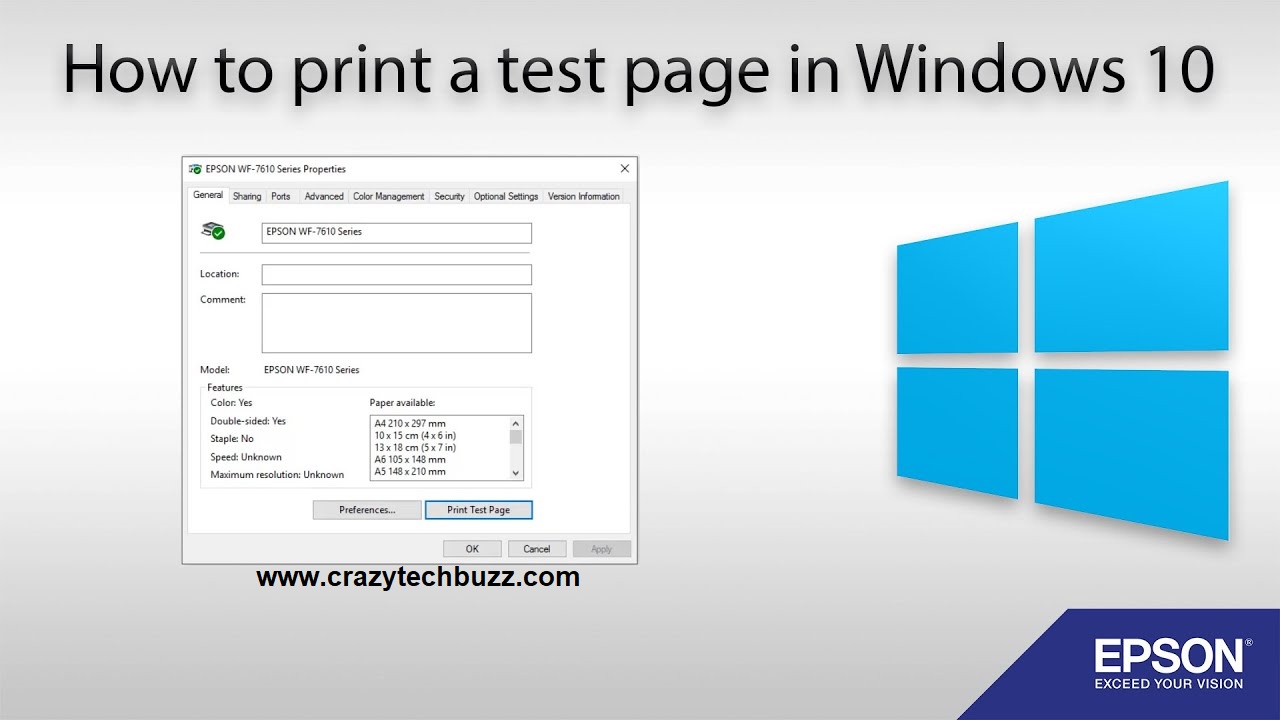
Click the Print Test Page button located at the bottom left corner of the window titled General Information about your device’s current status which looks like this example below:
Printing A Windows Test Page Using Windows XP
You can print a test page using Windows XP.
- Go to Start > Printers and Faxes.
- Right-click on the printer you want to print a test page for, and then click Properties.
Conclusion
I hope this article has helped you understand how to print a test page using your computer and printer. If you have any questions, please feel free to leave them in the comment section below.